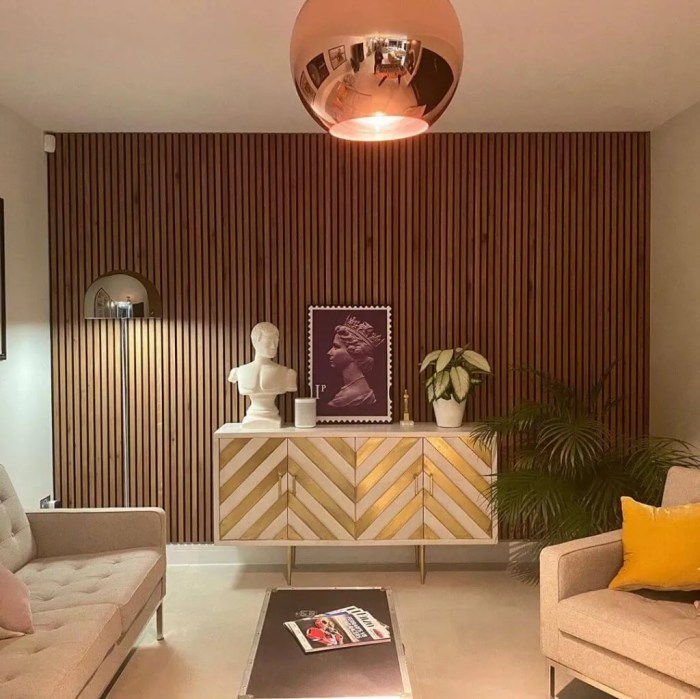
Decorative Wood Wall Panels offer a versatile and visually appealing way to transform any interior space. From rustic charm to modern elegance, the right wood paneling can dramatically enhance your home’s aesthetic. This comprehensive guide explores the diverse types of wood, installation methods, design considerations, maintenance tips, and cost factors associated with these beautiful and durable wall coverings. We’ll delve into various styles, from classic shiplap to contemporary herringbone patterns, and help you navigate the process of selecting and installing the perfect panels for your project.
Whether you’re a seasoned DIY enthusiast or a homeowner embarking on your first renovation project, this guide provides practical advice and step-by-step instructions to ensure a successful outcome. We’ll cover everything from choosing the right wood type and finish to mastering the installation techniques and maintaining your beautiful wood wall panels for years to come. Prepare to discover the transformative power of decorative wood wall panels and elevate your home’s design.
Installation Methods for Decorative Wood Wall Panels

Installing decorative wood wall panels can significantly enhance a room’s aesthetic appeal. The process, while manageable for DIY enthusiasts, requires careful planning and execution to ensure a professional, long-lasting result. Choosing the right installation method is crucial, depending on factors such as the type of panel, wall material, and desired level of permanence.
Preparation and Measurement
Before beginning installation, thoroughly prepare the wall surface. This involves cleaning the wall to remove dust, dirt, and any loose debris. Repair any imperfections like cracks or holes using appropriate filler and allow it to dry completely. Accurate measurements are paramount. Measure the wall area to be covered, taking into account any doors, windows, or obstacles.
Transfer these measurements to the panels, adding extra for cutting allowances. This meticulous preparation ensures a smooth installation process and prevents costly mistakes later.
Cutting Wood Wall Panels
Precise cutting is essential for a clean, professional finish. Use a sharp utility knife or circular saw, depending on the panel thickness and material. Always make test cuts on scrap pieces to get a feel for the cutting tool and material. For intricate cuts, a jigsaw might be necessary. Remember to wear appropriate safety gear, including eye protection and gloves, during the cutting process.
Accurate cutting minimizes wasted material and ensures a perfect fit for the panels.
Installation Methods: Adhesive, Nailing, and Screwing, Decorative Wood Wall Panels
Three primary methods exist for securing decorative wood wall panels: adhesive, nailing, and screwing. Adhesive application is suitable for lightweight panels and smooth walls, providing a clean, seamless look. However, it might not be as strong as nailing or screwing, especially for larger or heavier panels. Nailing is a common method, offering a strong hold, but requires careful planning to avoid damaging the panels or wall.
Countersinking nails and using wood filler to conceal them is crucial. Screwing provides the strongest hold and allows for easy removal or adjustments, but requires pilot holes to prevent splitting the panels. The choice depends on the specific panel type, wall material, and desired level of permanence.
Step-by-Step Installation Guide: Tongue and Groove Panels
This guide details the installation of tongue and groove wood wall panels, a popular choice for their ease of installation and attractive appearance.
- Prepare the Wall: Clean the wall surface thoroughly and make any necessary repairs. Ensure the wall is dry and free of dust.
- Apply Adhesive (Optional): For added security, apply a thin layer of construction adhesive to the back of the first panel. This step is particularly recommended for less sturdy wall surfaces.
- Install the First Panel: Align the first panel with a corner or a reference point, ensuring it’s level and plumb. Secure it using nails or screws (depending on your chosen method) along the top and bottom edges.
- Illustration: A diagram showing the first panel secured to the wall, with nails or screws visible. The panel is shown level and aligned to a corner, with a small gap between the wall and the panel edge.
- Install Subsequent Panels: Fit the tongue of each subsequent panel into the groove of the previously installed panel. Ensure a tight fit. Secure each panel using nails or screws, ensuring consistent spacing between panels.
- Illustration: A diagram showing two panels joined together, highlighting the tongue and groove connection. Nails or screws are shown securing the panels to the wall.
- Cut and Install Final Panel: Measure and cut the final panel to fit the remaining space. Install it as described above, ensuring a snug fit.
- Illustration: A diagram showing the final panel being installed, highlighting the cut edge. The panel is fitted into the groove of the previously installed panel.
- Caulk and Finish: Caulk any gaps between the panels and the wall or between adjacent panels using a paintable caulk. Once dry, paint or stain the panels to match your desired aesthetic.
- Illustration: A diagram showing the finished wall with the panels installed and caulking applied to the gaps.
Avoiding Common Installation Mistakes
Common mistakes include improper wall preparation, inaccurate measurements, and using the wrong fasteners. Failing to account for expansion and contraction of wood due to changes in temperature and humidity can lead to gaps or warping. Using blunt cutting tools can result in chipped or damaged panels. Careful planning, precise measurements, and the use of appropriate tools and materials will minimize these errors.
Transforming your home with decorative wood wall panels is a rewarding endeavor that blends aesthetics and functionality. By carefully considering the type of wood, installation method, and design elements, you can create a stunning and long-lasting feature wall that reflects your personal style. Remember to prioritize proper maintenance to preserve the beauty and longevity of your investment. With careful planning and execution, your wood wall panels will serve as a testament to your design vision for years to come, adding both warmth and character to your living space.